Wednesday, February 29

Whole Roasted Garlic Love

I can't even tell you how much we love garlic in my house...

It's practically in every dinner meal I make...actually it's in a lot of breakfast things I make too.

Like eggs, okay? Don't get freaked out.

One of my favorite things to do with garlic is roast it whole because it gives the cloves a wonderfully mild, sweet flavor and you can do so many things with it. 


You just cut the head of garlic across the top (not quite in half) enough to expose most of the cloves.


Dredge it in olive oil in a little foil package. Wrap it up, pop it in a 375 degree oven for 45 minutes and.....


Out comes moist, creamy garlic that will make a multitude of things taste amazing. 

To remove the cloves, you can scoop them with a little spoon or knife, but I find it easiest to just squeeze the head of garlic from the base towards the top, kind of like a toothpaste tube. Each clove will just sort of pop out. 

Then the fun begins. 

Use the cloves to dress up your favorite pasta, pizza or soup. 
Spread the whole buttery cloves onto a great crispy bread for a delicious side dish.
Mix the cloves into your favorite Salad dressing recipe.
Puree the cloves with white beans, lemon juice and oil to make a yummy dip.

The uses are endless...be creative and try things you might like. Just don't do this the night before a job interview. Or a first date. Like whoa.

Enjoy!

Tuesday, February 28

Whole Wheat and Flax English Muffins

I know what you're thinking...flax?? Whole wheat?? So far most of my posts have multiple references to sugary sweets, but I'm actually super into healthy eating and organic foods. That doesn't mean I don't enjoy me some Cinnamon Roll French Toast or a Red Velvet Brownie every now and then, but it does  mean that I am very careful to check the labels of everything I buy. I'm always looking for added sugars, high fat and calorie content and what actual nutritional value I am getting out of pre-packaged items. 

This is why I love making my own breads...I know exactly what's in them. And what's in these bad boys, is reeeeaaallllyyy good. I have found it pretty difficult to find some yummy and healthy english muffins, besides the Food 4 Life brand (they sell the ezekiel bread you see at Whole Foods). But that's ok, because making my own has turned out to be super easy and delicious!


The smell of yeast is so inviting...it immediately invokes memories of anything 'freshly baked'....or beer. I can't decide. 


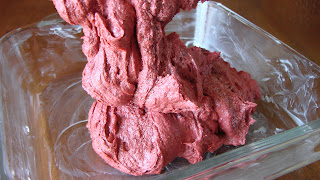
This recipe is adapted from a bag of Arrowhead Mills Stone Ground Wheat Flour I bought a while back. It looks like this after everything is dumped in the bowl. 


After a little kneading, you get this lovely, soft ball of goodness.


I am not ghetto for using a wine glass to cut my muffins, I am resourceful...anything round works. 


A little rising time on a cornmeal dusted pan and these breakfast babies will be puffed up and gorgeous.


See? I told you! Now, they are ready for the griddle...and in a few short minutes, they are ready to eat!


My husband absolutely loves his with pb&j, but they are great with butter, honey, cinnamon sugar, or...and yes I am about to go there...as a homemade egg mcmuffin. Seriously, they are sooo good with a little slice of ham, some scrambled egg and a good helping of cheese. Do it. 

Whole Wheat and Flax English Muffins
Adapted from Arrowhead Mills Stone Ground Whole Wheat Flour Bag

1 Cup warm water
1 package of active dry yeast (make sure its not expired or your muffins won't rise!)
3 T honey
1/4 Cup vegetable oil
1 tsp salt
2 Cups whole wheat flour (the Arrowhead Mills brand is nice and light, but you can use whichever brand you like, I've also used King Arthur and it works great)
1 Cup bread flour
3 T flax seeds (optional)
2 T chia seeds (optional)
You could also add raisins if you'd like
corn meal for dusting

Pour 1 Cup of warm (but not hot) water into a large bowl. Sprinkle the yeast over it and let it sit for a few minutes until it looks slightly foamy. Add all ingredients one at a time into water/yeast mixture.
Using a wooden spoon, mix everything together until it becomes hard to stir. The dough will NOT be completely incorporated at this point. Use your hands to knead the dough in the bowl, folding it in on itself and getting all of the remaining flour mixed in. It will start to get smooth and soft after a few minutes. Roll into a ball and set aside for a moment. Line a cookie sheet with foil or wax paper and generously sprinkle it with corn meal.

Roll the dough out onto a lightly floured surface to about 1/4 inch thickness. Using some sort of round cutter, cut as many muffins as you can from the rolled out dough, placing them on the cornmeal cookie sheet as you go. I usually get about 10-11 all together, but it depends on the size of your cutter. Repeat until there is only enough dough for one muffin left. You will probably have to form the last muffin using your hands. 

Cover the muffins with a kitchen towel and leave in a warm, dry place for an hour to rise. 
A few minutes before the hour is up, heat a griddle pan over medium heat. I use a pancake griddle set to 350 degrees. Once hot, place each muffin on the dry griddle and leave for 7 minutes. Flip each muffin and continue cooking for 7 minutes more, they should look golden brown. 

Remove from the pan and place on a wire rack to cool. Freshly baked they are ah-may-zing just the way they are. You can also toast them if you'd like. Once they are completely cool, I like to put them in a freezer bag and take one or two out each time I plan to eat them. This just keeps them extra fresh all week long. You can thaw them in the microwave or on the counter. 

Enjoy!

Saturday, February 25

The Week-Cap - Back and Ready for Round 2

Well, Well, Well...

Here we are again.


  • Monday was a holiday, which is a good thing because I really did not feel well. I drowned my sorrows in some really good Belgian Double Ale Beer and a nice Turkey Burger (recipe to come soon).
  • Tuesday I got to eat at one of my favorite restaurants which has a revolving sushi bar. Did I mention I am head over heels in love with sushi? No? Well now you know. My greatest kitchen sadness comes from not being able to recreate a proper rainbow roll in my house. And please don't tell me it can be done...it can't. Just take me to Benihana and let's agree to disagree.
  • Wednesday I got to audition for the Nickelodeon show, iCarly. Hooray! It was very exciting and I was super appreciative of the opportunity, despite having to endure about 4 hours of L.A. traffic...yikes. I also posted my method for making your own home spray...pretty nice to come home to a house that smells like Lavender-Eucalyptus after a long day.
  • Thursday, I discovered something called 'water marble nail art'...what the? have you seen this?? I don't normally paint my nails because I always end up chipping it off the same day. But this water marble thing is ridiculous and I am doing it this weekend...I'll let you know how it goes. 
  • Friday is a good day. Everyone is happy on Friday because the clock is ticking towards fun. And brunch. I love brunch. I didn't use to love it until my breakfast-food loving husband showed me the light. Friday I shared a perfect brunch recipe. Cinnamon Roll French Toast. Please make it. Whoever eats it will thank you and then you'll thank me and everyone will be even happier than they were on Friday.
Oh and by the way, for whatever reason my baking brain is repeating three ingredients in my head this week: Oreos, Peanut Butter and Marshmallows....lets see what comes out of this one. Ellie May is not so sure.


    Friday, February 24

    Cinnamon Roll French Toast


    This is a story of Evolution.

    A story of taking something that seriously needs no help in the 'I'm going to cry this is so good' category and somehow making it better. 

    Last weekend I, once again, made the Pioneer Woman's Cinnamon Rolls (have I mentioned them enough for you yet? just make them already!) and yes, they were amazing as usual. 

    As much as I love the idea of frosting the rolls out of the oven, I love even more the idea of being able to control the amount I slather on when eating...SLATHER being the key word. Here are the luscious rolls in all their unfrosted glory. 


    These rolls were fresh....but like 3 days ago. How did they last this long without being eaten? I honestly don't know and I think I need to reevaluate my commitment to good health. 

    So what do you do with 3 day old cinnamon rolls? The same thing you do with 3 day old bread... make French Toast!


    Slice those babies in half like a bun, being careful not to let them fall apart. Seriously, you could just toast these up, add butter and jam and be a very, very happy person. But I have a husband who has a mild obsession with French toast...so I will take it 4 steps further. 


    I'm kind of addicted to cinnamon....is there a problem with that? Mix up your eggs, Milk, Vanilla, and inordinate amounts of cinnamon in a shallow dish. 


    Cook them on a griddle or in a non stick skillet with a nice dollop of butter. The beautiful golden crusts are forming and I love how you can still see the cinnamon swirls of the rolls. 


    And serve them with your favorite breakfast meat, eggs prepared how you like them and a fat bottle of syrup. Heck, you don't even need the syrup, eggs or  meat, they are really just good by themselves. Or with that leftover cream cheese frosting...hmmmm.

    I'm aware that it was National Pancake Week this week...but you know what, I like being a rebel sometimes. 

    Cinnamon Roll French Toast

    A few day old Cinnamon Rolls (I used 3 for 2 people) you can use whatever recipe you like :)
    3/4 C Milk
    1/4 C Heavy Cream
    3 eggs
    1 tsp. Vanilla
    1-2 tsp. Cinnamon, depending on your taste
    1 T unsalted butter

    Slice the Rolls in half like a hamburger bun. In a shallow dish, whisk together the milk, cream, eggs, vanilla and cinnamon. You can add a dash of salt if you like a little savory flair too. Heat a non-stick skillet over medium high heat, or use a griddle pan, or an electric griddler. Melt the butter to coat the pan. Dredge each slice of Cinnamon Roll in the milk mixture, soaking it on each side for about 30 seconds. Place into the hot butter and cook until golden brown on each side. This should take about 3 minutes per side. Serve with your favorite breakfast accoutrements. 

    Enjoy!

    Wednesday, February 22

    HomeMade Room Spray

    Have you seen those Febreze commercials? You know the ones where 'real people' are blindfolded and put into disgusting, dirty rooms sprayed with Febreze and then asked what they smell?

    Those commercials make me very uncomfortable. First of all, those people are NOT real and if anyone put me in a room blindfolded, I would be worried about a lot of things besides whether I smell freesia or not. And second, someone has to clean that mess up...so, not cool Febreze...not cool. These ads are pretty much enough to make me not want to buy their products...I say, how about we just make our own? Sound good?

    Despite the list of ingredients on the bottle of most air fresheners, making room spray is actually super easy! It will save you quite a bit of cash over time, and you are in control of how it smells and what's inside it.

    All you need are a clean spray bottle, distilled water, vodka or rubbing alcohol and the essential oils of your choice. That's it! Essential oils can be pricey, but with the amount of spray you can make out of one little bottle, it's definitely worth it. And you most likely have rubbing alcohol, or vodka (don't lie), and distilled water costs like .80 cents, so you really have no excuse.


    A note on those essential oils: You can pick whatever combinations you like...floral, spicy, woody, or any combination of the three. I got my lavender oil at a wonderful little shop in Cambria, Ca called Exotic Nature, and the eucalyptus oil is from Ulta beauty supply. Every health food store (like Whole Foods, Sprouts, Mothers) carries oils. And you can get them online too. Do some sniffing next time you are in a health food store and pick a few you think compliment each other. Keep in mind the time of year as well. In the spring, maybe you want a more floral scent, in the summer, maybe something clean and crisp, like lemon or lime. And of course during the fall, something warm and spicy would be great.

    Okay, here goes. Fill your spray bottle about 2/3 the way with distilled water. Now finish filling it to the top with the vodka or alcohol. Add about 30-40 drops of your essential oils, depending on the size of the bottle and how fast your oils drip. My lavender oil drips fast and small, so I added about 30 drops of that, while my eucalyptus drips slower and larger, so I added about 10 drops. Start small and add as you go, testing the spray in whatever room you choose. Be sure to shake up the bottle each time you use it to get the oils mixed in properly. And that's it! You'll have a clean, fresh scented home customized the way you like it!

    I just used a piece of scotch tape to write on my bottle so I can easily change it when I make a new scent. 

    Try it! 

    Monday, February 20

    Easy White Wine and Mushroom Chicken


    These 6 ingredients are about to make you a fabulous meal...seriously, 6 things! Add in a couple of staple pantry ingredients, i.e. salt, pepper, flour, olive oil and broth and you have an absolutely delicious and quick, not to mention budget friendly, weeknight dinner.


    I have a rosemary bush, please come to my house and borrow some of it because I will never, ever use it up...never. Ever. I won't even know you took any, that's how much I have. Often recipes for mushroom chicken call for thyme, if that's what you happen to have on hand, go ahead and use it, but again, I have enough rosemary for a lifetime, so plan on seeing me chop it up a lot.

    Raw chicken is not beautiful

    I prefer to use Chicken Tenders for dishes like this because they are practically already cut up for you. You want about 1 inch square chunks, so just slice each tender into about 3-4 pieces. I used about 9 tenders for 2 people, but my husband really likes my food and tends to eat a lot of it, so I'm assuming you could feed 3 people with this recipe if you add a salad on the side.

    We prefer Cremini Mushrooms over here, especially how they pair with the earthy flavor of the rosemary. And buying them sliced and ready to go saves you quite a bit of time while cooking. If you can't find cremini's pre-cut, white button mushrooms will work just fine. Cooking is all about the flavors YOU like, so make it yours!

    Let's cook, shall we?

    White Wine and Mushroom Chicken
    You can easily double this recipe to feed more ;)
    About 9-10 boneless, skinless chicken tenders, cut into 1 inch chunks
    1/2 medium onion, sliced
    1 bag cremini (or button) mushrooms, sliced
    1-2 rosemary branches, stripped and chopped
    1/4 C dry white wine, such as sauvignon blanc or chardonnay (be sure to take a sip while cooking)
    1/4 C chicken broth
    1/4 C plus 1 T all-purpose flour
    salt and pepper to taste
    1 tsp. minced garlic, optional
    Egg Noodles (I used whole wheat, but you can totally use regular ones)

    Place a large saucepan of water over high heat to boil for the noodles. Heat a dab of butter and about a tablespoon of olive oil in a non-stick skillet over medium high heat. Place the 1/4 C of flour in a ziploc baggy with a pinch of salt and pepper. Slice your chicken tenders into chunks and place in the baggy. Close it tight and do a lil shake n bake dance until your chicken pieces are evenly coated in the bag. Using tongs, carefully remove the chicken from the bag and place into the hot oil/butter mixture.

    While the chicken cooks, slice up the onions and chop the rosemary and set aside. After about 3 minutes, check the chicken, if it is starting to turn golden brown, flip it over to cook the other side. Continue to cook the chicken another 3 minutes until it is golden on both sides. Remove the chicken from the pan and set it aside in some foil. At this point the chicken does not need to be cooked through, as you will return it to the pan later.

    Reduce the heat to medium low and place the sliced onions in the pan, if they look dry, add a tad more oil. Stir the onions and begin to cook them down for about 5 minutes. When they start to get tender, add the mushrooms and continue cooking and stirring occasionally. As the mushrooms start to wilt down, add the rosemary and garlic, if using. Cook 5 minutes more, until the mixture resembles the photo below. Turn the heat up slightly again to medium and add the white wine, allowing it to boil and cook down a bit. Then add the broth and continue allowing it to simmer.


    Make a sort of well in the center of the mushroom mixture and add the 1 tablespoon of flour, carefully sprinkling it into the pan while you stir quickly, do not add it all at once, as it will clump up. The sauce will begin to thicken into a gravy after a minute or two. If its not thick enough, add a dash more flour, if it is too thick, add a dash more broth. As it thickens, turn the heat down to low and add salt and pepper to taste. Salt draws the moisture out of mushrooms, so it is important not to add it until the end. Return the chicken to the pan, cover and continue to simmer on low for 5 minutes more. While the sauce simmers, place the egg noodles in the water, follow package directions, but they should only take 3-5 minutes to cook. Drain the noodles and place a spoonful in a dish. Top with the chicken and mushroom sauce and then a sprinkling of parmesan cheese to make it extra delicious and serve immediately.

    Enjoy!


    Saturday, February 18

    The Week-Cap - It's Valentine's Baby

    Here's my end of the week recap...aka the week-cap...all of the things I've posted/eaten/learned this week.


    • This was my first week ever blogging...and so far I LOVE it! I am so excited thinking of all the things I want to share in the future. If you missed my welcome post, here it is.
    • Monday I posted the slightly tweaked recipe for  Red Velvet Brownies by Jessica at How Sweet It Is. I was then notified that they may or may not be illegal in 38 states...obviously because they are so red.
    • Tuesday was Valentine's Day and this happened. It was a surprise to both of us, because the tickets were last minute and free from a co-worker...uh huh #kobesystem.
    • Wednesday it rained, so naturally the entire county came to a screeching halt...we Southern Californians are not very weather adaptive. 
    • Thursday I ate this for breakfast and decided I need to start making my own peanut butter and figure out how to grow bananas...I then retracted my commitment to the second idea. 
    • Friday I had the day off of work...yay!! So I spent it making The Pioneer Woman's Cinnamon Rolls for the 400th time (only a slight exaggeration), not to mention a freshly written recipe for Chocolate Chip cookies (which will become a post soon) AND dinner of Chicken in a White Wine and Mushroom sauce over Egg Noodles (look for that Monday or Tuesday). Whew, busy busy! Don't you wish you were here for breakfast?? 

    Friday, February 17

    Eclairs!


    How inviting is this sweet little puff of a dessert? Ever been intimidated to make eclairs? Think they are too advanced or have too many steps? Well guess what? These creamy, crispy, chocolately pastries are actually one of the easiest desserts I've ever made, and I have made a LOT of desserts!

    Yeah, I know this is my second "French" themed post in a week....but here's the thing, I'm technically French now (by marriage of course) and have pretty much loved the culture, food, eiffel tower for like at least half my life. Plus my last name has a silent "t", so that pretty much seals it.

    Let's start with the Choux (pronounced like shoe) pastry or as it is referred to in many French cookbooks, Pâte à choux. This pastry is a simple, easy to make dough that is the basis for many desserts. It's light and airy because it is mostly made of egg and it can be filled with any number of yummy things.

    Choux pastry coming together

    Classically though, the Eclair is filled with Crème Patisserie, which is just Pastry Cream, a thick, vanilla laden pudding-like treat. Oh my god I love homemade vanilla pudding. The cream can actually be changed slightly to be flavored how you like it....chocolate or coffee anyone??

    Out of the oven 


    This is a fantastic book that was gifted to me by a great friend at Christmas. It's basically the French Bible, so you should get to know it. This is a great resource for all things French and baked. This book has recipes for both the pastry cream and the choux pastry, but I did some extra research and adapting, as I found the directions for the pastry to be slightly vague in the book.

    The chocolate ganache is a basic recipe that anyone who loves chocolate should learn because it can literally top anything and is sooooo easy to make, like it takes 2 minutes, I'm not even kidding.

    1 minute down, 1 minute to go
    So, here is the recipe for all three elements of the Eclair, which I have adapted from various cookbooks. Seriously, what could be better than Vanilla Pudding, Chocolate Sauce and light, crispy egg Bread? Nothing, so go make them and then join the Eclair party below.


    Choux Pastry
    adapted from The Art of French Baking, by Ginette Mathiot

    1 Cup water
    1 stick of unsalted butter
    1 tsp salt
    2 tsp-1 T white sugar
    1 Cup all-purpose flour
    4 eggs, at room temperature

    Pastry Cream
    adapted from Dessert Circus, by Jacques Torres

    2 large eggs
    2 egg yolks
    1/2 Cup plus 2 T white sugar
    2 T cake flour
    1 T all purpose flour
    2 T cornstarch
    2 Cups whole milk
    1/2 vanilla bean
    3 T unsalted butter

    Chocolate Ganache

    4 oz (one thin bar) of good semi sweet chocolate, broken into chunks
    1/2 Cup heavy cream
    1-2 T unsalted butter

    For the Dough:
    Preheat the oven to 425
    In a medium saucepan, heat the stick of butter, sugar and salt in the water over med-high heat until boiling. Once boiling, remove the pan from the heat and add the flour quickly, stirring constantly with a wooden spoon. The dough should start to come away from the sides of the pan with the consistency similar to playdough. Switch to either a standing mixer with the paddle attachment or a hand mixer. Add each egg in one at a time, mixing constantly to avoid cooking the eggs in the warm dough. The dough should be smooth and sticky and able to fall slightly from the beaters. Place the dough in a large ziploc baggy or a piping bag. If using a baggy, cut about a half inch diagonally of the corner to create an opening the size of a silver dollar. On a baking sheet lined with parchment paper, pipe 9-11 logs of dough. They should be about 1 inch wide and 3-4 inches long, depending on how much dough you have. You can dip your finger in a small amount of water to smooth out any bumps or points form piping. Place the pastries in the oven and bake for 15 minutes at 425. Turn the oven down to 375 and continue to cook for 10-20 minutes. Watch them closely after 10 minutes, they are done when they are golden brown and hollow sounding when tapped. Turn the heat off when done and allow the eclairs to 'dry out' for another 5-10 minutes in the oven. When you remove them, they may deflate slightly, but that's okay, because they will puff up again when you fill them. Allow them to cool before filling. 

    For the Pastry Cream:
    In a medium bowl, whisk together the eggs, yolks, sugar, both flours and cornstarch until well combined. If all you have is all purpose flour, it will work fine, the cake flour is lighter which makes it easier to combine in the cream. Just be sure to sift the a.p. flour if thats all you use. Heat the milk in a saucepan over medium high heat. Slice the vanilla bean in half and scrape out the seeds with the side of a knife. Add both the seeds and the bean to the milk and bring to a boil. Carefully pour some of the hot milk into the egg mixture, stirring constantly to temper the eggs. Then poor everything back into the pan and whisk quickly, lowering the heat slightly so the cream does not burn. The mixture will begin to thicken and resemble pudding. Continue to whisk until it comes to a slight boil and coats the back of a spoon without moving. Remove the pan from the heat, and add the butter, stirring until completely melted and combined. Place the pastry cream in a bowl or tupperware and lay plastic wrap directly on the top of the cream to avoid developing a 'skin'. Allow it to cool and keep in the refrigerator for up to a week, or until ready to fill your eclairs.

    For the Ganache:
    Break up the chocolate into a small bowl. Heat the heavy cream over medium heat until simmering, being careful not to burn it. Poor the heavy cream directly over the chocolate and stir to melt it. Add the butter and continue to mix. It will start to become glossy and smooth as you stir it. When it looks like chocolate sauce, you're done! Place it in a jar or tupperware to store. You can refrigerate this as well and just microwave it for 20-30 seconds or place the jar in hot water to warm it up. 

    To Put the Eclairs Together:
    Place the pastry cream in a ziploc baggy or piping bag. Slice the ends of the eclairs about an inch (you can also just slice the entire eclair down the side if its easier). Pipe the cream into each eclair, filling as much as you desire (I like a LOT!), or just spoon it in if you sliced the eclair down the side. Place all of the filled eclairs on a tray and spoon the warm ganache over the top of each one. Allow the chocolate to dry, or if you don't mind a little mess, eat them right away! 

    Enjoy!

    Tuesday, February 14

    Because Who Doesn't Love a Champagne Cocktail??


    Well, actually, my husband can't stand Champagne in a cocktail, much less by itself, but that does not stop me from pouring some sparkly sweet bubbly when I feel like celebrating or being romantic. Lucky for me, today is Valentine's Day, which is the perfect time to indulge in a great bottle of Champagne! Maybe you've been meaning to buy your significant other a card, some flowers and candy or some sort of cute pink stuffed creature. Forget all that! Go to your local purveyor of alcoholic beverages and pick up some Champagne and a bottle of Crème de Cassis.

    What the heck is Crème de Cassis, you ask? It happens to be the basis of one of my very favorite classic French cocktails, the Kir Royale (thats keer roy-al). This is a super simple and easy way to fanicify your regular old Champagne (not that champagne is ever really regular or old), while making it the perfect color for a day like Valentine's. So lets make one!


    Crème de Cassis is a liquor made of blackcurrants. It is sweet and slightly tart and very thick and syrupy similar to a Port or dessert wine. Hence the name crème (cream) de cassis. You could drink it alone, but it would probably take a long time to get through a small amount and it is best used as a compliment to something else. Just fill your Champagne flute with as little or as much Cassis as you want. Typically, about an ounce is appropriate to flavor the drink correctly, but it really is up to taste. If you like more, add more! 


    Then, top the cassis with a good Champagne. It doesn't need to be real sweet, as the cassis will add that for you. A nice affordable Champagne is Moet & Chandon Impérial. It runs about $32.00, which is well worth it for a special occasion. I may or may not have sipped from the glass on the left already...I'm just sayin.


    I like to accent the cocktail with a bit of fresh fruit, which you actually could freeze to be used as fruit "ice cubes". Here, I used a strawberry for color and for the obvious shape. If you could find black currants (which look sort of like smaller, darker blueberries), you could use those as well. 


    The French don't typically mess around with tradition, so while I'm going to tell you that its okay to use Prosecco (Italian Sparkling Wine) instead of Champagne, and to experiment with flavors...please do not tell my husbands very French family that I told you....I'm serious, its a secret between you and me. The above shot is some lovely liquors I got in the Alsace region of France. They are blackberry (crème de mûre), strawberry (fraise) and peach (pêche de vigne). You could also use Chambord, which is a popular raspberry liquor you can find at any major retailer. My latest flavor obsession though, is Elderflower and since I discovered St. Germain Elderflower liquor, I've been using that in anything I can get my hands on.


    Here, I used the St. Germain instead of Cassis, which doesn't yield the same pretty pink hue, but sure tastes amazing. I decided to decorate this one with an edible flower, to better imply the flavor profile. 


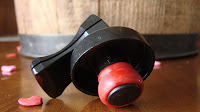
    Just in case you happen to have some leftover Champagne, which if all goes well, you shouldn't ;) you can easily save the rest of the bottle for at least a week in the refrigerator with a super tight stopper. You want one that expands when closed. On the left you can see how the red rubber puffs out to create an airtight seal, and when opened, it retracts and slips right off the bottle. Be careful the first time you re-uncork your champagne, it will pop slightly because of the carbonation build up. As you open and close it throughout the week, it will lose its bubble, so try to finish it within 3-4 sittings.

    Hope you enjoy this delicious and classic cocktail as much as I do! Now go give someone you love a big hug and tell them Happy Valentine's Day!!

    Monday, February 13

    Red Velvet Valentine

    Perfection


    You must be wondering, what is this delightfully colored, moist and delicious looking hunk of dessert?? Actually, you're probably thinking "Is that a red velvet brownie?" in which case you have incredible intuition and are now my best friend.

    One of my absolute favorite sweet treats is Red Velvet Cupcakes. There's something about that crumbly little cup of cake with its hint of cocoa, deep red hue and perfectly sweet/tangy cream cheese frosting that melts me. I honestly don't even know what it really is supposed to taste like...its not truly chocolatey, its not truly vanilla-y....its somewhere right in the middle...somewhere I really like hanging out. Thanks to the cupcake shop explosion over the last few years, there is practically a red velvet opportunity every few blocks. Really, walk out your door, go a few blocks, and I'm telling you, you'll find one in any nearby bakery...but please skip over any big grocery store chain, take my word they are not red, not velvet and not really cupcakes. So far my favorite non homemade red velvet anything, comes from Sprinkles Cupcakes, which started in Los Angeles and has since spread wildly around the country. Its good, really good, but it does tip heavy on the sweet scale, like tooth achingly sweet, so I control the craving to a 'birthday only' indulgence. But I gotta have my red velvet the other 11 months of the year, and what better time to have something red than Valentine's Day??


    And here's where its gets good. My husband loves all things gooey and chocolatey, and none of that milk chocolate business either, the darker the better. When asked what kind of dessert he would like for his birthday (or any day for that matter) his natural response would be "Brownies!" or "Really good chocolate chip cookies". So when I asked him if I could make something special for his coworkers for the Valentine Holiday, I should not have been shocked when he said "Red Velvet Brownies," I should have seen that coming from a mile away. But I didn't, oh no. Instead, I was utterly shocked that I hadn't thought of it first....slightly bitter actually. I am the HomeMaker after all! But I got over that and instantly got excited and started searching for the perfect recipe. After rummaging through posts and webpages of "cakey" red velvet brownie recipes (many of which used boxed cake mix...ummmm, no!) I stumbled upon a lovely little blog, How Sweet It Is, and the recipe I had been looking for. Red Velvet Brownies with White Chocolate Buttercream.....wait, no thats not what I wanted. Okay, so it kinda is, but I had to get my cream cheese in there somehow, so I adapted it slightly to fit my obsession a little closer. Needless to say, the brownies have not yet made it to the office...I guess I'll just have to bake more. 

    Finally, here it is:

    Red Velvet Brownies With Cream Cheese Icing
    adapted from Jessica at How Sweet It Is
    1/2 cup butter, at room temperature
    1 1/2 cups sugar
    2 eggs
    2 teaspoons vanilla extract
    1 1/4 cups all purpose flour
    1/4 teaspoon salt
    3 tablespoons cocoa powder
    2 tablespoons red food coloring
    2/3 cups chocolate chips (optional)
    Preheat oven to 350.
    Butter and flour an 8 x 8 cake pan.
    In a small bowl, combine cocoa powder, red food coloring, and 1 teaspoon vanilla to create a paste.
    In the bowl of an electric mixer, cream butter and sugar until fluffy. Add eggs one at a time, then add remaining teaspoon of vanilla. With the mixer on medium speed, add in cocoa powder mixture. Beat until batter is completely red. (If at this time your batter is NOT red, you can add a little more food coloring if desired. Color will depend on brand.) Add flour and salt, mixing until just combined. Fold in chocolate chips.
    Spread in the 8 x 8 pan. The original recipe says to bake for 25-30 minutes, however, my batter just doesn't set up that fast so you may have to increase the time by at least 20 minutes, or until toothpick inserted in center comes out clean. Let cool completely before frosting.
    Cream Cheese Icing
    1/2 an 8oz. package cream cheese, at room temperature
    about 4 T of unsalted butter, at room temperature
    2 Cups powdered Sugar, sifted
    dash of Vanilla extract
    pinch of salt
    This recipe is super adaptable and easy. If you want less frosting, use a little bit less of everything. If you want more, double it. I like my frosting drizzly, so play around with consistency. You can add a drop or two more of vanilla to loosen it up and make it easier to top the brownies. 
    In a medium bowl, mix the cream cheese and butter together with a fork or electric hand mixer. Slowly add in the powdered sugar, as it tends to dust up. Once it starts incorporating, add the salt and vanilla. Place the finished frosting in a piping bag, ziploc bag with a corner cut off or just spoon it out of the bowl and onto your brownies. 
    Enjoy!!

    Saturday, February 11

    Welcome!!

    Hi! Welcome to my very brand new blog! 


    I have always loved anything and everything having to do with keeping up a beautiful and happy home. Growing up, my mom taught me that you can always make something special, something delicious and something easy out of almost nothing at all. She made our average, suburban family home into what felt like our own little farm, complete with a garden of veggies in the backyard where a jacuzzi once sat. Dinner was a nightly family affair and if you tried hard enough, you could make or be anything you wanted to. 


    One of the things my mom always made for us was bread. As a child, I didn't really understand it. I thought bread was pretty cheap to buy and it seemed really hard to make. But when that bread was baking and the house filled with the fresh smell of a soft, chewy loaf, I would run to the kitchen. My absolute favorite thing was a fresh slice of Mom's bread with a little strawberry jam on it. Today, as a wife, I get it. Making bread may take a little bit of time, but the reward is so much greater. And I found that to be true with so many things, besides just a great meal. 


    Over this last Christmas, I had a few weeks off from work and made a big batch of The Pioneer Woman's Cinnamon Rolls (if you haven't done so yet, I highly recommend you do...and maybe I'll do a post about them in the future), and as I mixed the fresh dough, watched it rise, and smelled it baking in the oven, I made a decision. I decided that what I have learned not only from my mom, but from countless cookbooks, food shows, websites, traveling and life in general, should be shared. My hope is to inspire and I invite you to join me on my endless quest for how to keep my house and family the happiest and healthiest we can be. I plan to post recipes for all kinds of yummy food and drinks, as well as an occasional DIY craft and maybe a travel tip or two, or three :).


    Most of all, I plan to share this wonderful lifestyle that my husband and I are so blessed to live and to be the best HomeMaker I can be! 


    Thank you for finding me!


    Ashleigh

    ShareThis